Pages

Saturday, April 8, 2017

Unity Blog Hop!


Hi everyone!  Thanks for joining me on this Unity Stamp Company hop.  If you ended up here for another reason, be sure to visit the Unity Blog over at http://theunitystampco.blogspot.com/ and get started from the beginning!  If you make it all the way through the posts, leaving comments on each one, your name will be entered to win one of two prizes.  If you don’t already know, Unity is fantastically generous with prizes; I know you would love to win! 

This project was inspired by the month of March. Here’s the back story: I work in a high school as a coach for math teachers.  We had a teacher retire due to medical reasons at the beginning of March and her substitute, who had been filling in for a few months, quit around the same time.  With no warning, the students were without a teacher, so I stepped in to fill that role and tried to keep up with my regular responsibilities.  On top of trying to do two full time jobs, it was also the busiest month of the year for the youth group I run at my church; we had an event or two every week when we normally have an event or two every month.  
So, I was busy.  Very busy.  And I was starting to forget things, which just increased my stress level.  I started making to-do lists.  Here’s half of one for last Thursday.


It was functional but it was ugly.  I wanted some pretty to-do lists to be a spot of sunshine in my day.  I don’t have a stamp that will make those checkboxes, but I paged through my stamp binders and found a few little icons that could work and this to-do list organizer was born. 


The white cardstock list isn’t glued down; you can just pop it out of the photo corners and put in a different one.  I made a few designs for different days and different moods.  I can hang this up near my desk or on the fridge depending on where I need it. 
Want to make your own?  Here’s what you’ll need:
  • Paper or cardstock for your to-do lists.  I cut these to 2.75x8.5 so I could get 4 out of a sheet of cardstock.
  • Small icons or open designs for the checkboxes.  I chose a variety but the little heart is my favorite. It’s from the kit Love is a Magical Thing.  https://www.unitystampco.com/shop/love-is-a-magical-thing-november-2015-sentiment-kit/ 
  • Titles if you want them.  I used the kit About our Week for most.  https://www.unitystampco.com/shop/about-our-week/ 
  • Background or image stamps of your choosing.  I used the medallions from the February 2017 Kit of the Month: https://www.unitystampco.com/shop/unexpected-places-kom-217/ 
  • Larger cardstock for the background.  I cut the kraft paper to 4x11.  Then I matted it on a piece 4.25 x 11.25 
  • Some ribbon or twine to make a hanging loop.
  • 1”x 3” long strips of paper to fold into the corners.  Fold the paper at a 45-degree angle in the middle. Then fold the opposite end to touch, making a triangle.  Secure with washi tape or scotch tape because this part will be hidden.     
  • Washi tape to decorate, if desired.
I didn’t do any coloring on these because I plan to let myself color while I’m waiting on the phone or otherwise have my hands free.  Then, once the list is done, I can cut out the image and use it on a card.  Isn’t that a great way to get crafty throughout the day?  Here's a card I made with the same book image. 

Life is settling back down.  We had a new substitute start two weeks ago and she’s doing a great job. My to-do lists can be shorter now.  Thank goodness! 

Thanks again for visiting.  I hope this inspired you to make something other than a card or your typical project the next time you sit down to craft.  Be sure to continue along to the next stop on the hop, Helen at www.htbcreations.com.  I’m sure you’ll want to see the project she has waiting for you! 

Other stamp sets used:
https://www.unitystampco.com/shop/mamas-grandmas-april-2016-sentiment-kit/
https://www.unitystampco.com/shop/love-is-my-anchor/
https://www.unitystampco.com/shop/love-your-buns/
https://www.unitystampco.com/shop/you-are-strong-enough/
https://www.unitystampco.com/shop/unicorns-rainbows/
https://www.unitystampco.com/shop/love-is-in-the-pages/
https://www.unitystampco.com/shop/i-hope-you-feel-beautiful/
And that tiny, tiny "today" stamp?  It was in a grab bag! 

------
Proud Operation Write Home Alumni
Cards shipped to OWH in 2014: 21
Cards shipped to OWH in 2013: 829 blank and 301 AnyHero
Cards shipped to OWH in 2012: 1284 blank and 218 AnyHero
Cards shipped to OWH in 2011: 1695

Friday, January 27, 2017

Growing in Unity Day 5

It's Friday!  Thanks for joining me this week for Growing in Unity and for your kind comments on my cards.  I hope you found something to spark your creativity and maybe a new kit from Unity Stamp Company to add to your wish list.  

For my final card, I'm sharing a shaker card I made using the Hubba Hubba set. It was my first attempt at a shaker card and it was lots of fun! 
I stamped the robot's torso on a piece of acrylic salvaged from packaging and stamped the robot again on cardstock.  I cut out the torso from the cardstock, adhered the acrylic to the back of the cardstock, and used foam tape to make a complete frame around the outside of the torso, then filled it with some jewels.

Thanks again for joining me this week.  It was a pleasure to share some crafty inspiration with you and to share this week with Karen.  Remember to leave a comment so I can include you in the drawing for a grab bag of 25 random Unity stamps and do the same on Karen's blog!

Kathryn

------
Proud Operation Write Home alumni
Cards shipped to OWH in 2014: 21
Cards shipped to OWH in 2013: 829 blank and 301 AnyHero
Cards shipped to OWH in 2012: 1284 blank and 218 AnyHero
Cards shipped to OWH in 2011: 1695

Thursday, January 26, 2017

Growing in Unity Day 4

Thanks for visiting!  Here's today's card for my Growing in Unity week showcasing my Unity Stamp Company creations.


The stamps on this card all came from Love you to Pieces and the coloring was done with Copics in a range of B and BG hues.  This will be one of my fiancé's Valentine's day cards this year.  Last year, for our first Valentine's Day together, I made a card with the same stamp set.  We love doing jigsaw puzzles together, particularly when we're snowed in with nowhere to go!  I'm hoping Unity can come out with another puzzle kit so I can keep up my tradition of puzzle-themed cards.  

What are some clever sentiments to put with puzzle pieces?  I'd love to hear your creative ideas so I can continue to stretch this kit for many occasions with my fiancé. 

Remember that if you leave a comment, you'll be entered in a drawing to win 25 random stamps from Unity.  That's a fantastic prize and I'm sure you will love getting creative with the stamps if you win! Karen is also a GIU girl this week and she has a chance for you to win on her blog, too. 

Kathryn

------
Proud Operation Write Home Alumni
Cards shipped to OWH in 2014: 21
Cards shipped to OWH in 2013: 829 blank and 301 AnyHero
Cards shipped to OWH in 2012: 1284 blank and 218 AnyHero
Cards shipped to OWH in 2011: 1695

Wednesday, January 25, 2017

Growing in Unity Day 3

Happy Wednesday!  Give yourself a pat on the back for making it to the middle of the week!  I'm excited to be here today to share my third card for my week as a Growing in Unity girl for Unity Stamp Company.


The stamps in this set come from "Unicorns & Rainbows" and "Bonus Dad."  I masked the second part of the sentiment off ("...as my bonus dad") and have a card I can use for almost anyone.  This one is staying tucked away in my stash until I need it.  I might use it for St. Patrick's Day.

To make the background, I masked the center circle and colored with Copics.  I think this background is a great example of how well the markers blend.  I only used 7 markers to create the background; the variation in shade is all due to the overlapping of colors and the number of strokes of the marker I used.  I finished off the focal point with a doodled dotted line and this card is ready to roll.

Have you found a way to use a stamp that was far from its original purpose?

Remember to leave a comment so you're entered to win 25 random stamps from Unity Stamp Company!  Be sure to visit Karen today for a second chance to win.  Aren't her projects inspiring? 

Kathryn
------
Proud alumni of Operation Write Home
Cards shipped to OWH in 2014: 21
Cards shipped to OWH in 2013: 829 blank and 301 AnyHero
Cards shipped to OWH in 2012: 1284 blank and 218 AnyHero
Cards shipped to OWH in 2011: 1695

Tuesday, January 24, 2017

Growing in Unity #2

Welcome to my second Unity Stamp Company Growing in Unity post!  Don't forget to leave a comment so you have a chance to win a grab bag of 25 Unity stamps!  

If you're like me, you probably find it much harder to make cards for the guys in your life than for the women in your life because their interests are harder to capture in stamps.  Over the Christmas holiday, I was lucky to spend several consecutive days with my fiancé and my parents and we ended up talking about this very topic one evening when my mom sat down to make a card for a male friend's birthday.  I asked my fiancé what imagery he'd like to see on cards.  He said lighthouses are good. For a guy who works with computers, obsesses over fancy watches and cool cars, and likes to go hiking, I was a little surprised by his request. 

I'm always checking out the newest Unity releases to see if there are any stamps that he'd like.  While this one may not be new, and may not be quite the lighthouse he requested, it was inked up for the first time when I made this card.  You can get it for yourself on the Unity website; it's called "Celebrate."


The spotted paper was made with Dylusions ink sprays over white cardstock. I paper pieced the white sail. 

Remember to leave a comment so you are entered to win the 25 stamp grab bag from Unity Stamp Company at the end of the week!  Did you check out Karen's GIU post yet today?  She also has a chance for you to win those 25 random stamps, so head over there next. 

Kathryn

------
Proud Alumni of Operation Write Home
Cards shipped to OWH in 2014: 21
Cards shipped to OWH in 2013: 829 blank and 301 AnyHero
Cards shipped to OWH in 2012: 1284 blank and 218 AnyHero
Cards shipped to OWH in 2011: 1695

Monday, January 23, 2017

Growing in Unity #1

Hello everyone!  I'm happy to be one of this week's Unity Stamp Company Growing In Unity Gals.  Remember to come back all this week and comment so you can have a chance at winning a great prize from Unity!  Two people will receive 25 random stamps from Unity.  That is a fantastic prize! 

I wanted to start the week off by sharing a card I made for my great aunt's 90th birthday which was yesterday.  We threw her a big party and had a grand time!

For her card, I chose to design a free-standing three-dimensional card so she can display it easily for the next few days or weeks.

Here's a quick tutorial of what you need to do if you want to recreate the card.

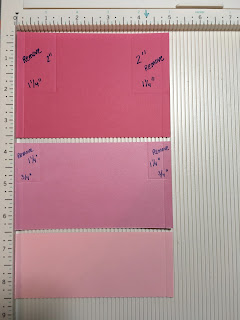
Cut a background piece to 4.25"x6".  Hold the paper landscape and score .75" from each end (so at 0.75" and at 5.25").  Round two top corners if desired.  Stamp with a background stamp if desired.  I used Numbers, etc. and a copper ink. 


Cut cake layers to 5"x 2", 5"x2.75", and 5"x3.5".  You may need to adjust the second measurement depending on the border punch you select.


Holding each piece landscape, score .25" from each end. On the largest piece, cut in 1.25" from the left and right and down 2".  On the medium piece, cut in .75" from the left and right and down 1.25".  This will remove a rectangle from each upper corner, leaving you with your layers.  Quick tip: if you have a large square punch, you can use that to make a perfect 90 degree angle.  For me, that was easier than fussing with my paper trimmer.


Use the border punch across the top edge of each cake piece.  Alternatively, you could use an embossing folder to add texture, stamps to add pattern, or select patterned papers. 

 
To assemble, fold back the side flaps on each cake layer.  Apply strong adhesive (ATG or red line tape are good bets) to the front of each of these flaps.  Line up the pieces on one side, fold them back, and fold the other side over top to meet.  You'll be staggering the tabs so that each layer is 1/4" closer to the back of the card than the next.  The card will fold flat to fit in an A2 envelope. 

Start by adhering the smallest layer so its score line meets the edge of the background paper.

Match the score line on the second layer to the edge of the first layer. 

The third layer should fit against the score line on the background paper.

Fold all three pieces over along the score lines. 

Use plenty of adhesive on each tab.  Then fold the background layer over to meet the three layers and press firmly to secure the adhesive.  


You can add candles or other embellishments as you desire.  This could also turn into a wedding card if you so choose just by swapping out the background stamp for another design and using the couple's wedding colors.  What will you create?

Don't forget to leave me a comment so I can enter you in the drawing for the grab bag of 25 random Unity stamps! Then, visit Karen's blog for her GIU posts and fantastic projects this week! 

Kathryn
------
Proud Operation Write Home Alumni
Cards shipped to OWH in 2014: 21
Cards shipped to OWH in 2013: 829 blank and 301 AnyHero
Cards shipped to OWH in 2012: 1284 blank and 218 AnyHero
Cards shipped to OWH in 2011: 1695


Monday, January 9, 2017

Snow Day Cards

I'm scheduled to be a Growing in Unity gal for Unity Stamp Company in two weeks and I have to admit that coming off of Christmas break, I felt stressed about it. I'd been crossing my fingers for a date in the summer or fall so I had plenty of time to prepare but that wasn't my luck. As I sat down and made cards last week after work a few nights in a row, I continued to be a little concerned with how I would get my items done and whether they would meet my standards. I used to be a regular, almost daily, blogger but gave it up when Operation Write Home ceased operation. My crafting has slowed down considerably in the past two years- between OWH no longer needing cards, the purchase of my first house, a new job, and getting engaged, I was only finding time for the "necessary" crafts like birthday cards for immediate family. (Yet, I'm still buying stamps!) So, as I sat down at my craft desk last week, I wasn't feeling as excited for this opportunity as I wanted to feel. But knowing that all of you would see my cards, I knew I needed to step up my game. I tried two new techniques. I wrote a tutorial. I broke out stamps that hadn't yet seen ink. And you know what? I think I'm back in a groove. We got some snow this weekend and today turned out to be a snow day. Though my GIU posts are done (and scheduled to post in advance), I made several more cards to celebrate occasions in the near future or to have on hand for those moments you need to grab a card quickly. Thanks to everyone at Unity who makes GIU possible and to all the GIU girls for sharing inspiration each week. 


This card is for my fiancé who is starting his penultimate law school classes this week.  He's been working hard to balance work, law school, and spending time with me and I want him to know I'm proud of him. 
Stamps from Inkadinkado and My Favorite Things, papers by Studio Calico 
 
This card is for my best friend who has lots of big life changes going on right now, including a new job.  I hope she loves it; she's going from a 15-minute commute to nearly a 2-hour commute.
Stamps from My Favorite Things; doily from Unity Stamp Co, papers by Studio Calico

For the stash:
Stamp from There She Goes, paper by DCWV

 For the stash:
Stamp from Unity Stamp Company; die by Cuttlebug


Do you ever make cards for your stash or are you always crafting with a recipient in mind?

Kathryn

------
Proud Operation Write Home Alumni
Cards shipped to OWH in 2014: 21
Cards shipped to OWH in 2013: 829 blank and 301 AnyHero
Cards shipped to OWH in 2012: 1284 blank and 218 AnyHero
Cards shipped to OWH in 2011: 1695